Monday, March 12, 2012

How to add Facebook Like/Fan Box to Blogger

A Facebook Fan Box or Like Box is a great plugin that allows blog visitors to subscribe to your blog updates via their Facebook accounts, without leaving your blog. Once subscribing (by pressing the like button), visitors will receive your most recent blog updates on their Facebook page. This box also displays faces of the "likers" on your blog. Before creating a fan box, you should already have a Facebook fan page. If you haven't yet created, click here to learn How to Create a Facebook Fan Page.

facebook like box

Create a Facebook Like Box

1. Find out your Facebook fan page URL by visiting your Facebook fan page and copy the URL in the address bar - you can see how your URL should look like in this screenshot:

facebook page address

2. Then visit this page: http://developers.facebook.com/docs/reference/plugins/like-box

3. Paste your URL into the Facebook Page URL field, as it is shown below:

create facebook fan box

4. Once you are satisfied with the looks of the Like Box, click on the "Get Code" button

5. You'll be given two codes, titled HTML 5, XFBML and IFRAME. The one we need is the 'iframe' code. Select it and copy the code generated in this box, as it is shown in the example below:

facebook iframe code

Add the Facebook Fan Box to Blogger

6. Log in to your Blogger account, go to 'Layout' > click on the 'Add a Gadget' link

blogger layout, add a gadget

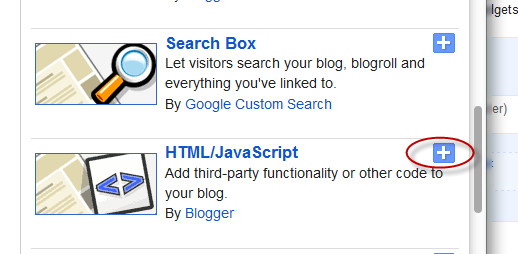
 7. From the pop-up window, scroll down and select the 'HTML/JavaScript' gadget:

html / javascript, blogger gadget

8. Paste the code in the empty HTML box:

javascript html gadget

9. Click Save and you're done.

Add Recent Comments Widget with Avatars To Blogger

In one of my previous tutorials, I have shared a simple Recent Comments widget having the ability to display the latest comments published on the blog posts. However, the main disadvantage of it was that it didn't have the option of showing the users' avatars; so for those who'd like to see something more, here's a stylish Recent comments widget with round avatars and comment excerpts. Besides providing the option of displaying the commenters avatars, we'll be able to change the default image for the anonymous avatar, as well.

Isn't that great? Let's begin adding it!


How to add recent comments widget with avatars

Step 1. Go to Blogger Dashboard > select your blog > go to 'Layout' & click the 'Add a Gadget' link.

avatars, recent comments blogger, blogger widgets

Step 2. When the popup window appears, scroll down and choose the 'HTML/Javascript' gadget.


Step 3. Now, copy and paste the following code inside the empty box:
<style type="text/css">
ul.helploggercomments{list-style: none;margin: 0;padding: 0;}
.helploggercomments li {background: none !important;margin: 0 0 6px !important;padding: 0 0 6px 0 !important;display: block;clear: both;overflow: hidden;list-style: none;word-break:break-all;}
.helploggercomments li .avatarImage {padding: 3px;
background: #fefefe;-webkit-box-shadow: 0 1px 1px #ccc;-moz-box-shadow: 0 1px 1px #ccc;box-shadow: 0 1px 1px #ccc;float: left;margin: 0 6px 0 0;position: relative;overflow: hidden;}
.avatarRound {-webkit-border-radius: 100px;-moz-border-radius: 100px;border-radius: 100px;}
.helploggercomments li img {padding: 0px;position: relative;overflow: hidden;display: block;}
.helploggercomments li span {margin-top: 4px;color: #666;display: block;font-size: 12px;font-style: italic;line-height: 1.4;}
</style>
<script type="text/javascript">
//<![CDATA[
    // Recent Comments Settings
    var
 numComments  = 5,
 showAvatar  = true,
 avatarSize  = 60,
 roundAvatar = true,
 characters  = 40,
 showMorelink = false,
 moreLinktext = "More »",
 defaultAvatar  = "https://blogger.googleusercontent.com/img/b/R29vZ2xl/AVvXsEiB33HS1qdU2O_zwR7wpCorTsHvUjhvhoegrEP994jxeGKD2yjif22uy2R1mYwDjXif6uyyTr-BzZCwokz5I0c2qeLYtTzdSDTyUj7mEAjzTdrXci2McYf5ses0EaawaEaZeJVlCwHBDL6J/s1600/default-avatar.jpg",
 hideCredits = true;
//]]>
</script>
<script type="text/javascript" src="http://helplogger.googlecode.com/svn/trunk/helplogger/[helplogger.blogspot.com]recent-comments.js"></script>
<script type="text/javascript" src="/feeds/comments/default?alt=json&callback=helploggercomments&max-results=5"></script><div style="font-size: 10px; float: right; margin-top: -15px">Get this <a href="http://helplogger.blogspot.com/2012/03/add-recent-comments-widget-with-avatar.html" rel="nofollow" >Recent Comments Widget</a></div>
Note
- by default, 5 comments will be displayed... to show more replace the "5" values in red
- to change the avatar for anonymous users, replace the following address with the url of your image:
https://blogger.googleusercontent.com/img/b/R29vZ2xl/AVvXsEiB33HS1qdU2O_zwR7wpCorTsHvUjhvhoegrEP994jxeGKD2yjif22uy2R1mYwDjXif6uyyTr-BzZCwokz5I0c2qeLYtTzdSDTyUj7mEAjzTdrXci2McYf5ses0EaawaEaZeJVlCwHBDL6J/s1600/default-avatar.jpg
- to change the size of the avatar, replace 60 value in green.
- for square avatars, remove the line in red

Step 4. After you've made the changes, click Save... and we're done!

Once a reader sees the recent comments widget in the blog's sidebar, he comes to know that your blog is pretty active and that encourages him to post comments on your blog. This way, you can gather some active user base to comment on your blog posts.

Sunday, March 11, 2012

Add Random Posts Widget to Blogger

The Random Posts widget or gadget for Blogger will display random posts added to your blog that, due to the natural structure of blogs, could get lost easily deep in your archives. Most of the time, when new people join your site, they rarely bother going back to find one of your good posts.

One of the easiest way to give a new life to your older posts is to display them in a random order in the sidebar. So, in this tutorial, I will show you how to add a random posts gadget in a Blogger blog. The advantages of this widget is that it can be easily customized and is loading pretty fast, besides displaying the thumbnails of your posts and how many comments they have received.

Do you want to add it? Just follow these steps below:


How to add Random Posts Widget to Blogger

Step 1. Log in to your Blogger account > go to 'Layout', click on the 'Add a Gadget' link:

random posts widget, random blogger

Step 2. Add a new 'HTML/JavaScript' gadget
random posts blogger

Step 3. Paste the following code inside the empty box:
<style>
#random-posts img {
    float: left;
    margin-right: 10px;
    width: 65px;
    height: 65px;
    background-color: #F5F5F5;
    padding: 3px;
}

ul#random-posts {
    list-style-type: none;
}

#random-posts li {
    margin-bottom: 10px;
}

.random-summary {
    display: block;
}
</style>

<ul id='random-posts'>
<script type='text/javaScript'>
var randomposts_number = 5;
var randomposts_chars = 60;
var randomposts_details = 'yes';
randomposts_details2 = 'no';
var randomposts_comments = 'Comments';
var randomposts_commentsd = 'Comments Disabled';
var randomposts_current = [];
var total_randomposts = 0;
var randomposts_current = new Array(randomposts_number);

function randomposts(json) {
    total_randomposts = json.feed.openSearch$totalResults.$t
}
document.write('<script type=\"text/javascript\" src=\"/feeds/posts/default?alt=json-in-script&max-results=0&callback=randomposts\"><\/script>');

function getvalue() {
    for (var i = 0; i < randomposts_number; i++) {
        var found = false;
        var rndValue = get_random();
        for (var j = 0; j < randomposts_current.length; j++) {
            if (randomposts_current[j] == rndValue) {
                found = true;
                break
            }
        };
        if (found) {
            i--
        } else {
            randomposts_current[i] = rndValue
        }
    }
};

function get_random() {
    var ranNum = 1 + Math.round(Math.random() * (total_randomposts - 1));
    return ranNum
};
</script>
<script type='text/javaScript'>
function random_posts(json) {
    for (var i = 0; i < randomposts_number; i++) {
        var entry = json.feed.entry[i];
        var randompoststitle = entry.title.$t;
        if ('content' in entry) {
            var randompostsnippet = entry.content.$t
        } else {
            if ('summary' in entry) {
                var randompostsnippet = entry.summary.$t
            } else {
                var randompostsnippet = "";
            }
        };
        randompostsnippet = randompostsnippet.replace(/<[^>]*>/g, "");
        if (randompostsnippet.length < randomposts_chars) {
            var randomposts_snippet = randompostsnippet
        } else {
            randompostsnippet = randompostsnippet.substring(0, randomposts_chars);
            var whitespace = randompostsnippet.lastIndexOf(" ");
            randomposts_snippet = randompostsnippet.substring(0, whitespace) + "&#133;";
        };
        for (var j = 0; j < entry.link.length; j++) {
            if ('thr$total' in entry) {
                var randomposts_commentsnum = entry.thr$total.$t + ' ' + randomposts_comments
            } else {
                randomposts_commentsnum = randomposts_commentsd
            }; if (entry.link[j].rel == 'alternate') {
                var randompostsurl = entry.link[j].href;
                var randomposts_date = entry.published.$t;
                if ('media$thumbnail' in entry) {
                    var randompoststhumb = entry.media$thumbnail.url
                } else {
                    randompoststhumb = "https://blogger.googleusercontent.com/img/b/R29vZ2xl/AVvXsEixSkXtAeN71rovkUOZma4J9N67lht7M6f0qwA2Fr3JOrIP-vWAe2m7AVKr77TVf-cOkubj6gtY-AP_b4a8rhK6MMW0TI7AquNwfGNLAOlMQpl2s0zeswOuAQhhNmecsCq8qcir71oJSbo/s1600/no_thumb.png"
                }
            }
        };
        document.write('<li>');
        document.write('<img alt="' + randompoststitle + '" src="' + randompoststhumb + '"/>');
        document.write('<div><a href="' + randompostsurl + '" rel="nofollow">' + randompoststitle + '</a></div>');
        if (randomposts_details == 'yes') {
            document.write('<span>' + randomposts_date.substring(8, 10) + '.' + randomposts_date.substring(5, 7) + '.' + randomposts_date.substring(0, 4) + ' - ' + randomposts_commentsnum) + '</span>'
        }
        if (randomposts_details2 == 'yes') {
            document.write('<span class="random-summary">' + randomposts_snippet) + '</span>'
        }
        document.write('<div style="clear:both"></div></li>')
    }
};
getvalue();
for (var i = 0; i < randomposts_number; i++) {
    document.write('<script type=\"text/javascript\" src=\"/feeds/posts/default?alt=json-in-script&start-index=' + randomposts_current[i] + '&max-results=1&callback=random_posts\"><\/script>')
};
</script>
</ul>
<div style="font-size: 10px; float: right;"><a href="http://helplogger.blogspot.com/2012/03/add-random-posts-widget-to-blogger.html" rel="nofollow">Random Posts Widget</a></div>

Customize the Random Posts Widget

If you want to show more than 5 posts, replace the 5 parameter.
To make the thumbnails bigger, change the pixels in red from width:65px; and height:65px;
To add the text snippets, change the no to yes in this line:
randomposts_details2='no';
To add more characters to the snippets, change the 60 parameter.
If you want to hide the post dates and comments, change yes to no, in this line:
var randomposts_details='yes';

Step 4. Press Save and that's it! Now you can enjoy this random posts widget on your Blogger blog.

Remove - Subscribe to: Posts (Atom) from Blogger

In many Blogger templates there is a "subscribe to: Posts (Atom)" link, so that the blog visitors can subscribe to the Atom feeds. Considering the fact that many readers use RSS for their blog feeds, many of you could find this link pretty useless. Moreover it occupies space at the bottom of the template and it doesn't look nice at all. In this case you might want to remove it.

How to remove subscribe to: Posts (Atom) link?


Step 1. Go to your Dashboard > Template > Edit HTML

Step 2. Click anywhere inside the code area, then press the CTRL + F keys to open Blogger' search box


Step 3. Find (CTRL + F) this line:
<b:include data='feedLinks' name='feedLinksBody'/>
Step 4. Remove it and click on the Save Template button to save the changes. That's it!

This should remove subscribe to: posts (atom) link.

Add Multi-Colored Popular Posts to Blogger

Popular Posts is a widget provided by Blogger that displays the most viewed posts on the blog in the last 7 days, last month and of all time. It has three displaying modes: display title only, display title with image thumbnail or display title along with the posts snippets.

To customize this popular posts widget, we have to add a new variable and some CSS codes to our blogger template. So let's begin:

popular posts widget, blogger gadgets


How to add multi-colored popular posts to Blogger

Step 1. Login to your Blogger Dashboard, go to Design >> Edit HTML

popular posts widget, blogger widgets

Step 2. Select "Expand Widget Templates" (make a backup first)

Step 3. Search for the following tag:

/* Variable definitions
   ====================

Note: If you can't find it, paste it below the autor information that is usually below this tag (CTRL + F):

 <b:skin><![CDATA[/* 

...and should end up with this symbol:
 
 ----------------------------------------------- */

Step 4. Copy and paste just below/after this tag, the next code:

<Group description="PopularPosts Backgrounds" selector="#PopularPosts1">
<Variable name="PopularPosts.background.color1" description="background color1" type="color" default="#fa4242" value="#ff4c54"/>
<Variable name="PopularPosts.background.color2" description="background color2" type="color" default="#ee6107" value="#ff764c"/>
<Variable name="PopularPosts.background.color3" description="background color3" type="color" default="#f0f" value="#ffde4c"/>
<Variable name="PopularPosts.background.color4" description="background color4" type="color" default="#ff0" value="#c7f25f"/>
<Variable name="PopularPosts.background.color5" description="background color5" type="color" default="#0ff" value="#33c9f7"/>
</Group>

Step 5. Search for the following piece of code:

]]></b:skin>

Step 6. Just above/before it, add this code:

#PopularPosts1 ul{margin:0;padding:5px 0;list-style-type:none}
#PopularPosts1 ul li{position:relative;margin:5px 0;border:0;padding:10px}
#PopularPosts1 ul li:first-child{background:$(PopularPosts.background.color1);width:90%}
#PopularPosts1 ul li:first-child:after{content:"1"}
#PopularPosts1 ul li:first-child + li{background:$(PopularPosts.background.color2);width:85%}
#PopularPosts1 ul li:first-child + li:after{content:"2"}
#PopularPosts1 ul li:first-child + li + li{background:$(PopularPosts.background.color3);width:80%}
#PopularPosts1 ul li:first-child + li + li:after{content:"3"}
#PopularPosts1 ul li:first-child + li + li + li{background:$(PopularPosts.background.color4);width:75%}
#PopularPosts1 ul li:first-child + li + li + li:after{content:"4"}
#PopularPosts1 ul li:first-child + li + li + li + li{background:$(PopularPosts.background.color5);width:70%}
#PopularPosts1 ul li:first-child + li + li + li + li:after{content:"5"}
#PopularPosts1 ul li:first-child:after,#PopularPosts1 ul li:first-child + li:after,#PopularPosts1 ul li:first-child + li + li:after,#PopularPosts1 ul li:first-child + li + li + li:after,#PopularPosts1 ul li:first-child + li + li + li + li:after{position:absolute;top:20px;right:-15px;border-radius:50%;background:#353535;width:30px;height:30px;line-height:1em;text-align:center;font-size:28px;color:#fff}
#PopularPosts1 ul li .item-thumbnail{float:left;border:0;margin-right:10px;background:transparent;padding:0;width:40px;height:40px}
#PopularPosts1 ul li a{font-size:12px;color:#444;text-decoration:none}
#PopularPosts1 ul li a:hover{color:#222;text-decoration:none}

Step 7. Now find the following code:

<b:widget id='PopularPosts1' locked='false' title='Popular Posts' type='PopularPosts'>

Step 8. Delete it until you reach at this tag (delete the </b:widget> also):

</b:widget>

Note: Be very careful when removing it. The entire fragment of code should look like this:

<b:widget id='PopularPosts1' locked='false' title='Popular Posts' type='PopularPosts'>
<b:includable id='main'>
  <b:if cond='data:title'><h2><data:title/></h2></b:if>
  <div class='widget-content popular-posts'>
    <ul>
      <b:loop values='data:posts' var='post'>
      <li>
        <b:if cond='data:showThumbnails == &quot;false&quot;'>
          <b:if cond='data:showSnippets == &quot;false&quot;'>
            <!-- (1) No snippet/thumbnail -->
            <a expr:href='data:post.href'><data:post.title/></a>
          <b:else/>
            <!-- (2) Show only snippets -->
            <div class='item-title'><a expr:href='data:post.href'><data:post.title/></a></div>
            <div class='item-snippet'><data:post.snippet/></div>
          </b:if>
        <b:else/>
          <b:if cond='data:showSnippets == &quot;false&quot;'>
            <!-- (3) Show only thumbnails -->
            <div class='item-thumbnail-only'>
              <b:if cond='data:post.thumbnail'>
                <div class='item-thumbnail'>
                  <a expr:href='data:post.href' target='_blank'>
                    <img alt='' border='0' expr:height='data:thumbnailSize' expr:src='data:post.thumbnail' expr:width='data:thumbnailSize'/>
                  </a>
                </div>
              </b:if>
              <div class='item-title'><a expr:href='data:post.href'><data:post.title/></a></div>
            </div>
            <div style='clear: both;'/>
          <b:else/>
            <!-- (4) Show snippets and thumbnails -->
            <div class='item-content'>
              <b:if cond='data:post.thumbnail'>
                <div class='item-thumbnail'>
                  <a expr:href='data:post.href' target='_blank'>
                    <img alt='' border='0' expr:height='data:thumbnailSize' expr:src='data:post.thumbnail' expr:width='data:thumbnailSize'/>
                  </a>
                </div>
              </b:if>
              <div class='item-title'><a expr:href='data:post.href'><data:post.title/></a></div>
              <div class='item-snippet'><data:post.snippet/></div>
            </div>
            <div style='clear: both;'/>
          </b:if>
        </b:if>
      </li>
      </b:loop>
    </ul>
    <b:include name='quickedit'/>
  </div>
</b:includable>
</b:widget>

Step 9. After you have deleted the above code, paste the following in its place:

<b:widget id='PopularPosts1' locked='false' title='Popular Posts' type='PopularPosts'>
<b:includable id='main'>
   <b:if cond='data:title'>
    <h2><data:title/></h2>
   </b:if>
   <div class='widget-content popular-posts'>
    <ul>
     <b:loop values='data:posts' var='post'>
      <li>
       <b:if cond='data:showThumbnails == &quot;false&quot;'>
        <b:if cond='data:showSnippets == &quot;false&quot;'>
         <a expr:href='data:post.href' expr:title='data:post.title' rel='bookmark'><data:post.title/></a>
        <b:else/>
         <a expr:href='data:post.href' expr:title='data:post.snippet' rel='bookmark'><data:post.title/></a>
        </b:if>
       <b:else/>
        <b:if cond='data:showSnippets == &quot;false&quot;'>
         <b:if cond='data:post.thumbnail'>
          <img class='item-thumbnail' expr:alt='data:post.title' expr:src='data:post.thumbnail'/>
         <b:else/>
          <img alt='no image' class='item-thumbnail' src='https://blogger.googleusercontent.com/img/b/R29vZ2xl/AVvXsEjTmrDsrlj6GVn0VoQznggVrD3hJtkAAyrPXimw2YIDqEq5udLbTdCiMbeM1Tk_yI2z2BCNkKnyP0NK4rNGBjm5D0VFoHdqFxq0bQh-tDMJy-qGpfqFWqo2PnLvqaJLPyNUuxPJqpPhEoQ/s1600/default.jpg'/>
         </b:if>
         <a expr:href='data:post.href' expr:title='data:post.title' rel='bookmark'><data:post.title/></a>
         <div class='clear'/>
        <b:else/>
         <b:if cond='data:post.thumbnail'>
          <img class='item-thumbnail' expr:alt='data:post.title' expr:src='data:post.thumbnail'/>
         <b:else/>
          <img alt='no image' class='item-thumbnail' src='https://blogger.googleusercontent.com/img/b/R29vZ2xl/AVvXsEjTmrDsrlj6GVn0VoQznggVrD3hJtkAAyrPXimw2YIDqEq5udLbTdCiMbeM1Tk_yI2z2BCNkKnyP0NK4rNGBjm5D0VFoHdqFxq0bQh-tDMJy-qGpfqFWqo2PnLvqaJLPyNUuxPJqpPhEoQ/s1600/default.jpg'/>
         </b:if>
         <a expr:href='data:post.href' expr:title='data:post.snippet' rel='bookmark'><data:post.title/></a>
         <div class='clear'/>
        </b:if>
       </b:if>
      </li>
     </b:loop>
    </ul>
   </div>
  </b:includable>
</b:widget>

Step 10. Save template.

Settings

- Go back to Layout  and click on the edit link of Popular Posts widget.

Select to "display up to 5 posts", then Save the widget.


- You can easily change the background color of the popular posts widget, going to Template >> Customize  >> Advanced >> PopularPostsBackground and there you can select any color you want.


You're done!

If you are enjoying reading this blog, please like & subscribe for more tutorials.
For any questions or suggestions, leave a comment below.

Recent Comments Widget For Blogger

The Recent Comments Widget for Blogger displays the most recent comments on your blog's sidebar, showing a snippet of the last comments along with the title of the post where the comment was made. The list will be gathered in descending order (newest at the top).

This gadget is coded in JavaScript and styled with CSS but there hasn't been added too much, so that it could fit the color scheme of your Blogger template.

Parameters to be configured:
a. Number of comments: total number of comments to display
b. Date on which the comment has been published: either display or hide it
c. Posts on which a comment has been made: you can either hide the post titles or show them
d. Number of words per comment excerpt: The first "n'' words of the comment will be listed

To add the Recent Comment Widget to a Blogger blog is very easy.  Just follow the next steps below:

How To Add Recent Comments Widget to Blogger

Step 1. Log in to your Blogger Dashboard, select your blog > go to "Layout" and click the "Add a Gadget" link:


Step 2. From the pop-up window, scroll down and click on the "HTML/JavaScript" option:


Step 3. Copy and paste the below code in the HTML/JavaScript box:
<script style=text/javascript src="http://helplogger.googlecode.com/svn/trunk/recent comments widget.js"></script>
<script style=text/javascript>
    var a_rc = 5;
    var m_rc = false;
    var n_rc = true;
    var o_rc = 100;
</script>
<script src=http://your-blog-name.blogspot.com/feeds/comments/default?alt=json-in-script&callback=showrecentcomments></script><div style="font-size: 10px; float: right;">Get this <a href="http://helplogger.blogspot.com/2012/03/recent-comments-widget-for-blogger.html" rel="nofollow" >Recent Comments Widget</a></div>
<style type="text/css">
.rcw-comments a {
    text-transform: capitalize;
}

.rcw-comments {
    border-bottom: 1px dotted;
    padding-top: 7px!important;
    padding-bottom: 7px!important;
}
</style>

Step 4. Replace http://your-blog-name.blogspot.com with your address (pay attention to not have two forward slashed at the end of it).

Other settings:
- to change the number of comments that are being displayed, replace the "5" value from a_rc=5;
- to add the date on which the comment has been made, change the "false" text from m_rc=false to "true";
- to hide the post titles, change the "true" text from n_rc=true to "false";
- to show more or less comment characters, change the "100" value from o_rc=100

Step 5. Click the "Save" button and go to see the recent comments widget on your Blogger blog!

Saturday, March 10, 2012

Hide/Show Widgets/Gadgets in Home/post/static/archive pages in Blogger

As some of you may have noticed, all the widgets/gadgets you add to your blog, will be displayed on all the pages by default, including the homepage as well. And I'm sure very few know that AdSense could disable your account in case you've put ad units inside the content of your contact or privacy policy pages. Therefore, hiding certain elements inside your blog pages is not only a matter of design, but it is also a requirement.

To hide (or show) widgets in particular posts, static pages, homepage or archive pages, you can use conditional tags.

Step 1. Go to Blogger's Dashboard > Layout and name the HTML/Javascript gadgets that you have already added. Doing this, it will be easier for you to identify the widgets that you have in your Blogger's template. Give it a unique title so that it does not match with any of the titles of any other widgets already added.

Step 2. Next thing to do is to go to Template and click on Edit HTML

blogger template, edit html


Step 3. Click anywhere inside the code area and press the CTRL + F keys to open the search box

blogger template, ctrl + f, search box

Step 4. Find the HTML of your widget by typing the widget's name in the search box - hit Enter.

Let's say that the title for one of my widgets is "Recent Posts". After searching for the widget's name, I will find a similar code in my template:
<b:widget id='HTML1' locked='false' title='Recent Posts' type='HTML'>
<b:includable id='main'>
<!-- only display title if it's non-empty -->
<b:if cond='data:title != ""'>
<h2 class='title'><data:title/></h2>
</b:if>
<div class='widget-content'>
<data:content/>
</div>

<b:include name='quickedit'/>
</b:includable>
</b:widget>  

This code represents the widget/gadget that I have added in the Page Elements location (Layout).

Step 5. After you've found your widget's code, add the following conditional tags marked with red just below and above to hide the widget from specific pages or posts in Blogger. For instance, in case you want:

To show the widget only in Homepage:

<b:widget id='HTML1' locked='false' title='Recent Posts' type='HTML'>
<b:includable id='main'>
<b:if cond='data:blog.url == data:blog.homepageUrl'>
<!-- only display title if it's non-empty -->
<b:if cond='data:title != ""'>
<h2 class='title'><data:title/></h2>
</b:if>
<div class='widget-content'>
<data:content/>
</div>

<b:include name='quickedit'/>
</b:if>
</b:includable>
</b:widget>

To show Blogger widget only in post pages 

<b:widget id='HTML1' locked='false' title='Recent Posts' type='HTML'>
<b:includable id='main'>
<b:if cond='data:blog.pageType == "item"'>
<!-- only display title if it's non-empty -->
<b:if cond='data:title != ""'>
<h2 class='title'><data:title/></h2>
</b:if>
<div class='widget-content'>
<data:content/>
</div>

<b:include name='quickedit'/>
</b:if>
</b:includable>
</b:widget>

To hide Blogger widget in post pages

<b:widget id='HTML1' locked='false' title='Recent Posts' type='HTML'>
<b:includable id='main'>
<b:if cond='data:blog.pageType!= "item"'>
<!-- only display title if it's non-empty -->
<b:if cond='data:title != ""'>
<h2 class='title'><data:title/></h2>
</b:if>
<div class='widget-content'>
<data:content/>
</div>

<b:include name='quickedit'/>
</b:if>
</b:includable>
</b:widget>

To show the widget in a specific page
 
<b:widget id='HTML1' locked='false' title='Recent Posts' type='HTML'>
<b:includable id='main'>
<b:if cond='data:blog.url == "URL of the page"'>
<!-- only display title if it's non-empty -->
<b:if cond='data:title != ""'>
<h2 class='title'><data:title/></h2>
</b:if>
<div class='widget-content'>
<data:content/>
</div>

<b:include name='quickedit'/>
</b:if>
</b:includable>
</b:widget>

Note: Replace URL of the page with the address of the page in which you want the widget to appear

To hide a widget only in a particular page

<b:widget id='HTML1' locked='false' title='Recent Posts' type='HTML'>
<b:includable id='main'>
<b:if cond='data:blog.url != "URL of the page"'>
<!-- only display title if it's non-empty -->
<b:if cond='data:title != ""'>
<h2 class='title'><data:title/></h2>
</b:if>
<div class='widget-content'>
<data:content/>
</div>

<b:include name='quickedit'/>
</b:if>
</b:includable>
</b:widget> 

To show widgets only in static pages

<b:widget id='HTML1' locked='false' title='Recent Posts' type='HTML'>
<b:includable id='main'>
<b:if cond='data:blog.pageType == "static_page"'>
<!-- only display title if it's non-empty -->
<b:if cond='data:title != ""'>
<h2 class='title'><data:title/></h2>
</b:if>
<div class='widget-content'>
<data:content/>
</div>

<b:include name='quickedit'/>
</b:if>
</b:includable>
</b:widget> 

To hide widgets in Static Pages

<b:widget id='HTML1' locked='false' title='Recent Posts' type='HTML'>
<b:includable id='main'>
<b:if cond='data:blog.pageType != "static_page"'>
<!-- only display title if it's non-empty -->
<b:if cond='data:title != ""'>
<h2 class='title'><data:title/></h2>
</b:if>
<div class='widget-content'>
<data:content/>
</div>

<b:include name='quickedit'/>
</b:if>
</b:includable>
</b:widget> 

To show widgets only in Archive Pages

 <b:widget id='HTML1' locked='false' title='Recent Posts' type='HTML'>
<b:includable id='main'>
<b:if cond='data:blog.pageType == "archive"'>
<!-- only display title if it's non-empty -->
<b:if cond='data:title != ""'>
<h2 class='title'><data:title/></h2>
</b:if>
<div class='widget-content'>
<data:content/>
</div>

<b:include name='quickedit'/>
</b:if>
</b:includable>
</b:widget> 

Note:  Pay attention each time you're adding a new address which should end up with .com, otherwise it may not work.

Step 6. After you have added the conditional tags, Save Template and view your blog.

That's it!