Monday, April 29, 2013

How To Add A Tabbed Navigation Widget to Blogger

The tabviews are elements that allow us to group in a single container various gadgets and these can be selected via tabs.
Its main function is to save space on the blog to avoid scattered gadgets in the same category so you can group multiple gadgets into one. There are several methods for creating tabviews, some require jQuery, other MooTools, or any other script.
To add this widget to your blog, just follow the steps below:

Step 1. From your Blogger Dashboard, go to Template and click on the Edit HTML button

Step 2. Expand the style of the template, by clicking on the sideways arrow before <b:skin> ... </b:skin>


Step 3. Search using CTRL + F for the following tag:

]]></b:skin>


Step 4. Just above it, add the following code:

/* Tabview for Blogger
----------------------------------------------- */
.tabviewcont{
margin:15px 0;
padding:0;
clear:both;
}

.tabviewnav {
margin: 0 0 0 14px;
padding:3px 0; /* If you are using a Blogger Template change 0 with 15px */
font-size:12px; /* Font size of text inside tabs */
font-weight:bold;
}
.tabviewnav li {
list-style:none;
margin:0;
display:inline;
}
.tabviewnav li a {
padding:3px 6px;
margin-right:1px;
background:#F6F6F6; /* The background color of the tabs */
border-radius:5px 5px 0 0;
-moz-border-radius:5px 5px 0 0;
-webkit-border-radius:5px 5px 0 0;
text-decoration:none;
color:#222222;
}
.tabviewnav li a:hover {
color:#222222;
background:#EBEBEB; /* Background color of the tab on mouseover */
text-decoration:none;
}
.tabviewnav li.tabviewactive a,
.tabviewnav li.tabviewactive a:hover {
background:#EBEBEB; /* Background color of the active tab */
color:#222222;
}
.tabviewcont .tabviewtab {
padding:5px;
border:1px solid #EEEEEE; /* Border around the container */
background:#fff; /* The background color of the gadget */
}
.tabviewcont .tabviewtab h2,
.tabviewcont .tabviewtabhide {
display:none;
}
.tabviewtab .widget-content ul{
list-style:none;
margin:0 0 10px 0;
padding:0;
}
.tabviewtab .widget-content li {
border-bottom:1px solid #ccc;
margin:0 5px;
padding:2px 0 5px 0;
}

Step 5. Find the </head> tag and just above it, paste this script:

<script type='text/javascript'>
// Tabview for grouping gadgets

//<![CDATA[
document.write('<style type="text/css">.tabview{display:none;}<\/style>');function tabviewObj(argsObj){var arg;this.div=null;this.classMain="tabview";this.classMainLive="tabviewcont";this.classTab="tabviewtab";this.classTabDefault="tabviewtabdefault";this.classNav="tabviewnav";this.classTabHide="tabviewtabhide";this.classNavActive="tabviewactive";this.titleElements=['h2','h3','h4','h5','h6'];this.titleElementsStripHTML=true;this.removeTitle=true;this.addLinkId=false;this.linkIdFormat='<tabviewid>nav<tabnumberone>';for(arg in argsObj){this[arg]=argsObj[arg]}this.REclassMain=new RegExp('\\b'+this.classMain+'\\b','gi');this.REclassMainLive=new RegExp('\\b'+this.classMainLive+'\\b','gi');this.REclassTab=new RegExp('\\b'+this.classTab+'\\b','gi');this.REclassTabDefault=new RegExp('\\b'+this.classTabDefault+'\\b','gi');this.REclassTabHide=new RegExp('\\b'+this.classTabHide+'\\b','gi');this.tabs=new Array();if(this.div){this.init(this.div);this.div=null}}tabviewObj.prototype.init=function(e){var childNodes,i,i2,t,defaultTab=0,DOM_ul,DOM_li,DOM_a,aId,headingElement;if(!document.getElementsByTagName){return false}if(e.id){this.id=e.id}this.tabs.length=0;childNodes=e.childNodes;for(i=0;i<childNodes.length;i++){if(childNodes[i].className&&childNodes[i].className.match(this.REclassTab)){t=new Object();t.div=childNodes[i];this.tabs[this.tabs.length]=t;if(childNodes[i].className.match(this.REclassTabDefault)){defaultTab=this.tabs.length-1}}}DOM_ul=document.createElement("ul");DOM_ul.className=this.classNav;for(i=0;i<this.tabs.length;i++){t=this.tabs[i];t.headingText=t.div.title;if(this.removeTitle){t.div.title=''}if(!t.headingText){for(i2=0;i2<this.titleElements.length;i2++){headingElement=t.div.getElementsByTagName(this.titleElements[i2])[0];if(headingElement){t.headingText=headingElement.innerHTML;if(this.titleElementsStripHTML){t.headingText.replace(/<br>/gi," ");t.headingText=t.headingText.replace(/<[^>]+>/g,"")}break}}}if(!t.headingText){t.headingText=i+1}DOM_li=document.createElement("li");t.li=DOM_li;DOM_a=document.createElement("a");DOM_a.appendChild(document.createTextNode(t.headingText));DOM_a.href="javascript:void(null);";DOM_a.title=t.headingText;DOM_a.onclick=this.navClick;DOM_a.tabview=this;DOM_a.tabviewIndex=i;if(this.addLinkId&&this.linkIdFormat){aId=this.linkIdFormat;aId=aId.replace(/<tabviewid>/gi,this.id);aId=aId.replace(/<tabnumberzero>/gi,i);aId=aId.replace(/<tabnumberone>/gi,i+1);aId=aId.replace(/<tabtitle>/gi,t.headingText.replace(/[^a-zA-Z0-9\-]/gi,''));DOM_a.id=aId}DOM_li.appendChild(DOM_a);DOM_ul.appendChild(DOM_li)}e.insertBefore(DOM_ul,e.firstChild);e.className=e.className.replace(this.REclassMain,this.classMainLive);this.tabShow(defaultTab);if(typeof this.onLoad=='function'){this.onLoad({tabview:this})}return this};tabviewObj.prototype.navClick=function(event){var rVal,a,self,tabviewIndex,onClickArgs;a=this;if(!a.tabview){return false}self=a.tabview;tabviewIndex=a.tabviewIndex;a.blur();if(typeof self.onClick=='function'){onClickArgs={'tabview':self,'index':tabviewIndex,'event':event};if(!event){onClickArgs.event=window.event}rVal=self.onClick(onClickArgs);if(rVal===false){return false}}self.tabShow(tabviewIndex);return false};tabviewObj.prototype.tabHideAll=function(){var i;for(i=0;i<this.tabs.length;i++){this.tabHide(i)}};tabviewObj.prototype.tabHide=function(tabviewIndex){var div;if(!this.tabs[tabviewIndex]){return false}div=this.tabs[tabviewIndex].div;if(!div.className.match(this.REclassTabHide)){div.className+=' '+this.classTabHide}this.navClearActive(tabviewIndex);return this};tabviewObj.prototype.tabShow=function(tabviewIndex){var div;if(!this.tabs[tabviewIndex]){return false}this.tabHideAll();div=this.tabs[tabviewIndex].div;div.className=div.className.replace(this.REclassTabHide,'');this.navSetActive(tabviewIndex);if(typeof this.onTabDisplay=='function'){this.onTabDisplay({'tabview':this,'index':tabviewIndex})}return this};tabviewObj.prototype.navSetActive=function(tabviewIndex){this.tabs[tabviewIndex].li.className=this.classNavActive;return this};tabviewObj.prototype.navClearActive=function(tabviewIndex){this.tabs[tabviewIndex].li.className='';return this};function tabviewAutomatic(tabviewArgs){var tempObj,divs,i;if(!tabviewArgs){tabviewArgs={}}tempObj=new tabviewObj(tabviewArgs);divs=document.getElementsByTagName("div");for(i=0;i<divs.length;i++){if(divs[i].className&&divs[i].className.match(tempObj.REclassMain)){tabviewArgs.div=divs[i];divs[i].tabview=new tabviewObj(tabviewArgs)}}return this}function tabviewAutomaticOnLoad(tabviewArgs){var oldOnLoad;if(!tabviewArgs){tabviewArgs={}}oldOnLoad=window.onload;if(typeof window.onload!='function'){window.onload=function(){tabviewAutomatic(tabviewArgs)}}else{window.onload=function(){oldOnLoad();tabviewAutomatic(tabviewArgs)}}}if(typeof tabviewOptions=='undefined'){tabviewAutomaticOnLoad()}else{if(!tabviewOptions['manualStartup']){tabviewAutomaticOnLoad(tabviewOptions)}}
//]]>
</script>

Step 6. Finally, look for this line:

<div class='column-right-inner'>

Or if you use an old template of Blogger, search this line:

<div id='sidebar-wrapper'>

Step 7. Paste below one of these two lines, this code:

<div class='tabview'>
<b:section class='tabviewtab' id='Tab1' maxwidgets='1'/>
<b:section class='tabviewtab' id='Tab2' maxwidgets='1'/>
<b:section class='tabviewtab' id='Tab3' maxwidgets='1'/>
</div>

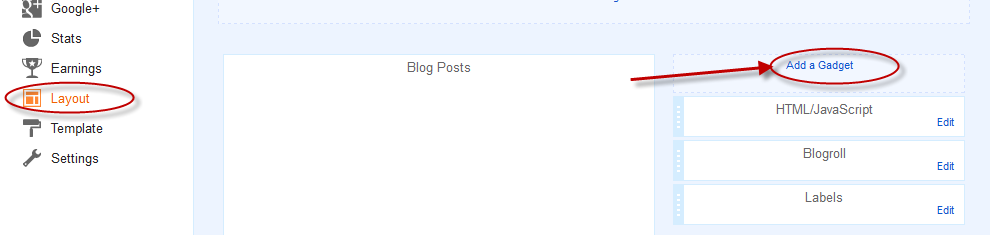
Step 8. Save changes, and go to Layout and there you will see the new areas to add gadgets.


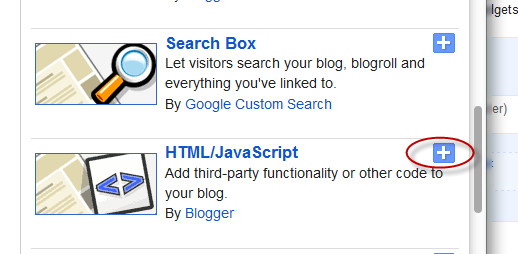
You just have to click on Add a Gadget to add the gadget to the tab that corresponds, or drag a gadget you already have to that section.

If you want to add more tabs, then just add before the last </div> a line like this:

<b:section class='tabviewtab' id='Tab4' maxwidgets='1'/>

Note that each line you add should have a different ID, for example Tab5, Tab6, etc..

You can add multiple tabs, just repeat the last step and likewise remember to change the name of the IDs.

Remember that if your sidebar is too narrow, then you should not put a lot of tabs, or tab titles that are very long.
You should also note that this gadget does not speed up the loading speed of the blog, is only to group gadgets into one, even, depending on the blog-may take a while to load the tabview.

Friday, April 26, 2013

Expandable Recent Comments Widget for Blogger/Blogspot

This Expandable Recent Comments is a very accessible widget that can be collapsed or expanded through user interaction, so that now, we don't have to click on the commenter or post title link in order to see the content of a comment.
recent comments widget, blogger gadgets, blogspot tricks

The expanding content can be shown or hidden by clicking on the plus/minus icon or by pressing the "Show all" or "Hide all" button at run time.
How To Add The Expandable Recent Comments Widget to Blogger

Step 1. Log in to your Blogger dashboard and go to Layout > Click on "Add a Gadget" link


Step 2. From the pop-up window, scroll down and click on the HTML/JavaScript widget


Step 3. Copy and paste this code inside the empty box:
<style type="text/css" media="screen">
.row-aa {        background: #f2f2f3; }
.row-bb {        background: #F8F5F1; }
.row-div { 
  margin:0px;
  padding:5px;
}
.comment-header {
  font-size:0.9em;
//  border:1px solid #E0E0E0;
//  background-color:#F3F3F3;
  padding:4px;
  margin-top:10px;
  margin-bottom:5px;
}
.comment-box {
  margin:0px;
  padding:0px;
  font-size:0.9em;
  height:500px;
  overflow:auto;
}
.comments1  { 
//  background: #F3F3F3;
  padding:3px;
  border-left:1px dashed #A6A6A6;
  color: #888888;
  font-style: italic;
  padding-top:4px;
  margin-bottom:5px;
}
.comment-footer {
  text-align:center;
  font-size:0.9em;
  padding:4px;
  margin-top:5px; 
}
</style>

<div style="text-align: center" class="comment-header"><input class="comment-button" id="commshowall" type="button" onclick="if (this.value == &#39;Show all&#39;) { unfold_all(this); this.value=&#39;Hide all&#39;; } else { fold_all(this); this.value=&#39;Show all&#39;; }" style="width:8em;font-size:1em;font-family:Verdana,sans" value="Show all" /></div>

<div class="comment-box">
<script type="text/javascript" src="http://helplogger.googlecode.com/svn/trunk/expandable-recent-comments.js"></script>
<script type="text/javascript"  src="http://helplogger.blogspot.com/feeds/posts/default?start-index=1&max-results=999999&alt=json-in-script&callback=showrecentposts">
</script>
<script type="text/javascript"  src="http://helplogger.blogspot.com/feeds/comments/default?start-index=1&max-results=999999&alt=json-in-script&callback=showrecentcomments">
</script>

</div>

Note: Replace http://helplogger.blogspot.com with your blog/site address.

Step 4. Save your widget and you're done!

Enjoy :)

Saturday, April 13, 2013

Create Horizontal Navigation Menu With Drop Down Submenus Using CSS

The following drop down menu is made only with CSS, is a horizontal menu with sub-tabs and the right side has a rounded search. A menu is handy for those who do not require complex menus or prefer not to use one that requires scripts and/or too many images, also the installation and customization is quite simple, and to top it off is quite functional.
To see this drop down menu in action, visit this demo blog

blogger menu, drop down menu, css menu

Prior to doing anything, if you are using a Template made through Blogger Template Designer, then you should consider doing these changes in the template, otherwise the menu might not be displayed correctly:

From your Blogger's Dashboard, go to Template (make a backup < see the screenshot) > Edit HTML:


and search (CTRL + F) for the following line:

<b:section class='tabs' id='crosscol' maxwidgets='1' showaddelement='yes'>

Screenshot

Remove the code in red.
You may have many parts as the one in red, delete all you find.

....then find this section in your template:
/* Tabs
----------------------------------------------- */

...and remove all that is within it, until you reach to the Headings part.

/* Tabs
----------------------------------------------- */
.tabs-outer {
overflow: hidden;
position: relative;
background: $(tabs.background.color) $(tabs.background.gradient) repeat scroll 0 0;
}

#layout .tabs-outer {
overflow: visible;
}

.tabs-cap-top, .tabs-cap-bottom {
position: absolute;
width: 100%;

border-top: 1px solid $(tabs.border.color);

}

.tabs-cap-bottom {
bottom: 0;
}

.tabs-inner .widget li a {
display: inline-block;

margin: 0;
padding: .6em 1.5em;

font: $(tabs.font);
color: $(tabs.text.color);

border-top: 1px solid $(tabs.border.color);
border-bottom: 1px solid $(tabs.border.color);
border-$startSide: 1px solid $(tabs.border.color);
}

.tabs-inner .widget li:last-child a {
border-$endSide: 1px solid $(tabs.border.color);
}

.tabs-inner .widget li.selected a, .tabs-inner .widget li a:hover {
background: $(tabs.selected.background.color) $(tabs.background.gradient) repeat-x scroll 0 -100px;
color: $(tabs.selected.text.color);
}

/* Headings
----------------------------------------------- */

Then add this to where the code has been removed (instead of the code in green):
#crosscol ul {z-index: 200; padding:0 !important;}
#crosscol li:hover {position:relative;}
#crosscol ul li {padding:0 !important;}
.tabs-outer {z-index:1;}
.tabs .widget ul, .tabs .widget ul {overflow: visible;}
Having done this, we can finally add our menu.

How To Add Horizontal Drop Down Menu to Blogger

To put this horizontal menu with submenus in your blog, then follow the next steps:

Step 1. From Template, go to Edit HTML and just above ]]></b:skin> paste these styles:
/* Horizontal drop down menu
----------------------------------------------- */
#menuWrapper {
width:100%; /* Menu width */
height:35px;
padding-left:14px;
background:#333; /* Background color */
border-radius: 10px; 
}
.menu {
padding:0;
margin:0;
list-style:none;
height:35px;
position:relative;
z-index:5;
font-family:arial, verdana, sans-serif;
}
.menu li:hover li a {
background:none;
}
.menu li.top {display:block; float:left;}
.menu li a.top_link {
display:block;
float:left;
height:35px;
line-height:34px;
color:#ccc;
text-decoration:none;
font-family:"Verdana", sans-serif;
font-size:12px; /* Font size */
font-weight:bold;
padding:0 0 0 12px;
cursor:pointer;
}
.menu li a.top_link span {
float:left;
display:block;
padding:0 24px 0 12px;
height:35px;
}
.menu li a.top_link span.down {
float:left;
display:block;
padding:0 24px 0 12px;
height:35px;
}
.menu li a.top_link:hover, .menu li:hover > a.top_link {color:#fff; }
.menu li:hover {position:relative; z-index:2;}
.menu ul,
.menu li:hover ul ul,
.menu li:hover ul li:hover ul ul,
.menu li:hover ul li:hover ul li:hover ul ul,
.menu li:hover ul li:hover ul li:hover ul li:hover ul ul
{position:absolute; left:-9999px; top:-9999px; width:0; height:0; margin:0; padding:0; list-style:none;}

.menu li:hover ul.sub {
left:0;
top:35px;
background:#333; /* Submenu background color */
padding:3px;
white-space:nowrap;
width:200px;
height:auto;
z-index:3;
}
.menu li:hover ul.sub li {
display:block;
height:30px;
position:relative;
float:left;
width:200px;
font-weight:normal;
}
.menu li:hover ul.sub li a{
display:block;
height:30px;
width:200px;
line-height:30px;
text-indent:5px;
color:#ccc;
text-decoration:none;
}
.menu li ul.sub li a.fly {
/* Submenu Background Color */
background:#333 url(https://blogger.googleusercontent.com/img/b/R29vZ2xl/AVvXsEgGQGvz8mRECwCy0ppWb4HiXh8gAN0WBncokg-zM9TSuhfcKLwxlQky7iMRqGWQc8lpHlcDdolpDQKRMWd0ceriAxL8NByaxRq5v05imdcY6P2xprGLjnwnWNc3UR9OhPYpOhuLyTknCOs/s1600/arrow_over.gif) 185px 10px no-repeat;}
.menu li:hover ul.sub li a:hover {
background:#515151; /* Background Color on mouseover */
color:#fff;
}
.menu li:hover ul.sub li a.fly:hover, .menu li:hover ul li:hover > a.fly {
/* Background on Mouseover */
background:#646464 url(https://blogger.googleusercontent.com/img/b/R29vZ2xl/AVvXsEgGQGvz8mRECwCy0ppWb4HiXh8gAN0WBncokg-zM9TSuhfcKLwxlQky7iMRqGWQc8lpHlcDdolpDQKRMWd0ceriAxL8NByaxRq5v05imdcY6P2xprGLjnwnWNc3UR9OhPYpOhuLyTknCOs/s1600/arrow_over.gif) 185px 10px no-repeat; color:#fff;}

.menu li:hover ul li:hover ul,
.menu li:hover ul li:hover ul li:hover ul,
.menu li:hover ul li:hover ul li:hover ul li:hover ul,
.menu li:hover ul li:hover ul li:hover ul li:hover ul li:hover ul {
left:200px;
top:-4px;
background: #333; /* Background Color of the Submenu */
padding:3px;
white-space:nowrap;
width:200px;
z-index:4;
height:auto;
}
#search {
width: 228px; /* Width of the Search Box */
height: 50px;
float: right;
z-index: 2;
text-align: center;
margin-top: 5px;
margin-right: 6px;
/* Background of the Search Box */
background: url(https://blogger.googleusercontent.com/img/b/R29vZ2xl/AVvXsEia2QFhKbbPefGimIAOf85CfhuZsSPJcdqoLD7ybh_Erg7cpB-m-OK6wmBlgD-XeyElb8j3ZrNFjrmU-f_0PdLWWpVok2oz-a4h3mcWUY1M7VNPcbdFCCqF_tI0Vmao9Y6Q92vr2jR9wI4/s1600/searchBar1.png) no-repeat;
}
#search-box {
margin-top: 3px;
border:0px;
background: transparent;
text-align:center;
}


Screenshot
Step 2. Save the Template


Step 3. Go to Layout > click on Add a Gadget link


Step 4. Choose HTML/Javascript and paste the following inside the empty box:

<div id='menuWrapper'>
<ul class='menu'>
<li class='top'><a class='top_link' href='Link URL'><span>Title 1</span></a></li>

<li class='top'><a class='top_link' href='Link URL'><span class='down'>Title 2</span></a><ul class='sub'><li><a class='fly' href='Link URL'>Submenu 2.1</a><ul>
<li><a href='Link URL'>Submenu 2.1.1</a></li>
<li><a href='Link URL'>Submenu 2.1.2</a></li>
<li><a href='Link URL'>Submenu 2.1.3</a></li>
</ul>
</li>
<li class='mid'><a class='fly' href='Link URL'>Submenu 2.2</a>
<ul>
<li><a href='Link URL'>Submenu 2.2.1</a></li>
<li><a href='Link URL'>Submenu 2.2.2</a></li>
<li><a href='Link URL'>Submenu 2.2.3</a></li>
<li><a class='fly' href='Link URL'>Submenu 2.2.4</a>
<ul>
<li><a href='Link URL'>Submenu 2.2.4.1</a></li>
<li><a href='Link URL'>Submenu 2.2.4.2</a></li>
<li><a href='Link URL'>Submenu 2.2.4.3</a></li>
</ul>
</li>
<li><a href='Link URL'>Submenu 2.2.5</a></li>
<li><a class='fly' href='Link URL'>Submenu 2.2.6</a>
<ul>
<li><a href='Link URL'>Submenu 2.2.6.1</a></li>
<li><a href='Link URL'>Submenu 2.2.6.2</a></li>
</ul>
</li>
</ul>
</li>
<li><a href='Link URL'>Submenu 2.3</a></li>
<li><a href='Link URL'>Submenu 2.4</a></li>
<li><a href='Link URL'>Submenu 2.5</a></li>
</ul>
</li>

<li class='top'><a class='top_link' href='Link URL'><span class='down'>Title 3</span></a>
<ul class='sub'>
<li><a href='Link URL'>Submenu 3.1</a></li>
<li><a href='Link URL'>Submenu 3.2</a></li>
<li><a href='Link URL'>Submenu 3.3</a></li>
<li><a href='Link URL'>Submenu 3.4</a></li>
</ul>
</li>

<li class='top'><a class='top_link' href='Link URL'><span class='down'>Title 4</span></a>
<ul class='sub'>
<li><a href='Link URL'>Submenu 4.1</a></li>
<li><a class='fly' href='Link URL'>Submenu 4.2</a>
<ul>
<li><a href='Link URL'>Submenu 4.2.1</a></li>
<li><a href='Link URL'>Submenu 4.2.2</a></li>
<li><a href='Link URL'>Submenu 4.2.3</a></li>
<li><a href='Link URL'>Submenu 4.2.4</a></li>
<li><a href='Link URL'>Submenu 4.2.5</a></li>
<li><a href='Link URL'>Submenu 4.2.6</a></li>
</ul>
</li>
<li><a href='Link URL'>Submenu 4.3</a></li>
<li><a href='Link URL'>Submenu 4.4</a></li>
<li><a href='Link URL'>Submenu 4.5</a></li>
<li><a href='Link URL'>Submenu 4.6</a></li>
</ul>
</li>

<li class='top'><a class='top_link' href='Link URL'><span class='down'>Title 5</span></a>
<ul class='sub'>
<li><a href='Link URL'>Submenu 5.1</a></li>
<li><a href='Link URL'>Submenu 5.2</a></li>
<li><a href='Link URL'>Submenu 5.3</a></li>
</ul>
</li>


<!-- Search Bar -->
<li>
<form action='/search' id='search' method='get' name='searchForm' style='display:inline;'>
<input id='search-box' name='q' onblur='if (this.value == &quot;&quot;) this.value = &quot;Search here...&quot;;' onfocus='if (this.value == &quot;Search here...&quot;) this.value = &quot;&quot;;' size='28' type='text' value='Search here...'/></form>
</li>

</ul>
</div>

Customization:

- replace the text in blue and red with your links and titles.
- if you need more tabs, then add a line like this just above <!-- Search Bar -->

<li class="top"><a href="Link URL" class="top_link"><span>Title</span></a></li>

- if you want to add a tab with sub-tabs, then add this code:

<li class="top"><a href="Link URL" class="top_link"><span class="down">Title</span></a>
<ul class="sub">
<li><a href="Link URL">Submenu Title</a></li>
</ul>
</li>

- and if you want one of the other sub-tabs have sub-tabs then remove a line like the one in orange and change it to a code like this:

<li><a href="Link URL" class="fly">Submenu Title</a>
<ul>
<li><a href="Link URL">Other Submenu</a></li>
</ul>
</li>

And that's it! Now Save your Widget and enjoy your new drop down menu! ;)

Friday, April 12, 2013

How To Use The New Blogger HTML Editor

The Blogger template editor now includes a number of changes that seem interesting and make it much more friendly than it was.

To begin with, what we see now is all the template's code starting with numbered and colored lines showing us different code snippets: tags, variables, properties, etc.. depending on the HTML, CSS, JavaScript and even the language of Blogger - include, b:if and other occurrences.

blogger template, blogger tricks, blogger widgets

This is what any decent external editor does, but certainly, from now on it will be much easier to find that little bug that drives us crazy when we omit quotation marks or add one more semicolon. This also applies to CSS, which appears mostly in dark blue without distinguishing selectors and rules, but the rest is a major improvement.
Another great help are the numbers that appear in front of each fragment of code, so that we can easily pinpoint and correct errors of this type: "Error parsing XML, line 103, column 9: The element ... "

Using the New Blogger Template HTML Editor

When you want to search for a code in the HTML editor, click inside the editor and press CTRL + F on your keyboard, then enter what you want to find in the search box that appears inside the editor.


Finally, hit the "ENTER" button on your keyboard and it should take you to the requested code.

If you want to be taken to the section of code that belongs to a particular widget, just click on the Jump To Widget button at the top of the editor, choose the widget's name from the list and it will take you directly to that portion of code.


The CSS rules can be found folded at the top of the template, between <b:skin>...</b:skin> and <b:template-skin>...</b:template-skin> tags. To expand them, you have to click on the sideways arrow next to the line number.


Another great functionality is that now we can Preview Template in the same window without needing to leave the page and we can easily go back to customize our template by clicking on the Edit Template button.

Finally, Format template re-orders the code, adding indentation automatically.

As always, we must use the Save button for the changes to take effect or we can Revert the changes.

And that's it. With a bit of effort, we can easily familiarize with this new HTML editor. Surely as usual and even reasonable to be something inherent in the human condition, this change does not appeal to many. Same with the Lightbox for images, the new template designer, the new desktop and other new things that have been added in the past. But who now remembers that they once were new?
----------
For more info, check out this post on the Blogger Buzz blog, where Google software engineers +Samantha Schaffer and +Renee Kwang explained the steps for moving the date of a blog post from above the post title to underneath it, as an example in using the new Blogspot HTML editor.

Monday, April 1, 2013

Show Recent Posts With Thumbnails For Particular Label or Category in Blogger

Sometimes we want to have everything organized, so that our readers can find topics of interest more easily. To accomplish this, instead of putting a widget with the latest posts, we can put together the latest entries sorted by category, so that we'll be able to show the latest posts for each label we want and also display a thumbnail for our category.

recent posts by labels

To add this recent posts widget for labels or categories in a Blogger blog, follow the next steps:

Recent Posts with Thumbnails Sorted by Labels

Step 1. From your Blogger Dashboard, go to 'Template' and click the 'Edit HTML' button


Step 2. Click anywhere inside the code area and search (CTRL + F) for this piece of code:
]]></b:skin>

Just above ]]></b:skin>, paste this CSS style:
/* Recent posts by labels
--------------------------------- */
img.label_thumb{
float:left;
margin-right:10px !important;
height:65px; /* Thumbnail height */
width:65px; /* Thumbnail width */
border: 1px solid #fff;
-webkit-border-radius: 10px;
-moz-border-radius: 10px;
border-radius: 10px;
-webkit-box-shadow: 0 1px 1px rgba(0, 0, 0, .4);
-moz-box-shadow: 0 1px 1px rgba(0, 0, 0, .4);
box-shadow: 0 1px 1px rgba(0, 0, 0, .4);
}

#label_with_thumbs {
float: left;
width: 100%;
min-height: 70px;
margin: 0px 10px 2px 0px;
padding: 0;
}
ul#label_with_thumbs li {
padding:8px 0;
min-height:65px;
margin-bottom:0px;
border-bottom: 1px dotted #999999;
}

#label_with_thumbs li{
list-style: none ;
padding-left:0px !important;
}

#label_with_thumbs a { text-transform: uppercase;}
#label_with_thumbs strong {padding-left:0px; }
Step 3. Now try to find this tag:
</head>
... just above </head> add this script:
<script type='text/javascript'>
//<![CDATA[
function labelthumbs(json){document.write('<ul id="label_with_thumbs">');for(var i=0;i<numposts;i++){var entry=json.feed.entry[i];var posttitle=entry.title.$t;var posturl;if(i==json.feed.entry.length)break;for(var k=0;k<entry.link.length;k++){if(entry.link[k].rel=='replies'&&entry.link[k].type=='text/html'){var commenttext=entry.link[k].title;var commenturl=entry.link[k].href;}
if(entry.link[k].rel=='alternate'){posturl=entry.link[k].href;break;}}var thumburl;try{thumburl=entry.media$thumbnail.url;}catch(error)
{s=entry.content.$t;a=s.indexOf("<img");b=s.indexOf("src=\"",a);c=s.indexOf("\"",b+5);d=s.substr(b+5,c-b-5);if((a!=-1)&&(b!=-1)&&(c!=-1)&&(d!="")){thumburl=d;}else thumburl='https://blogger.googleusercontent.com/img/b/R29vZ2xl/AVvXsEjFzxCA0YYZBqlXpiDWVo1zSne0SfEvJ3AESOovnS53dd-HIccOoSQFdcf4ggoFXjJA-PAuw5zctbGLPB4gzktrlgN9jWGg4jAkyx0-ijMnfaoapIKmYNHmYorbH4zdMROY1aG7zDrhruQ/s1600/picture_not_available.png';}
var postdate=entry.published.$t;var cdyear=postdate.substring(0,4);var cdmonth=postdate.substring(5,7);var cdday=postdate.substring(8,10);var monthnames=new Array();monthnames[1]="Jan";monthnames[2]="Feb";monthnames[3]="Mar";monthnames[4]="Apr";monthnames[5]="May";monthnames[6]="June";monthnames[7]="July";monthnames[8]="Aug";monthnames[9]="Sept";monthnames[10]="Oct";monthnames[11]="Nov";monthnames[12]="Dec";document.write('<li class="clearfix">');if(showpostthumbnails==true)
document.write('<a href="'+posturl+'" target ="_top"><img class="label_thumb" src="'+thumburl+'"/></a>');document.write('<strong><a href="'+posturl+'" target ="_top">'+posttitle+'</a></strong><br>');if("content"in entry){var postcontent=entry.content.$t;}
else
if("summary"in entry){var postcontent=entry.summary.$t;}
else var postcontent="";var re=/<\S[^>]*>/g;postcontent=postcontent.replace(re,"");if(showpostsummary==true){if(postcontent.length<numchars){document.write('');document.write(postcontent);document.write('');}
else{document.write('');postcontent=postcontent.substring(0,numchars);var quoteEnd=postcontent.lastIndexOf(" ");postcontent=postcontent.substring(0,quoteEnd);document.write(postcontent+'...');document.write('');}}
var towrite='';var flag=0;document.write('<br>');if(showpostdate==true){towrite=towrite+monthnames[parseInt(cdmonth,10)]+'-'+cdday+' - '+cdyear;flag=1;}
if(showcommentnum==true)
{if(flag==1){towrite=towrite+' | ';}
if(commenttext=='1 Comments')commenttext='1 Comment';if(commenttext=='0 Comments')commenttext='No Comments';commenttext='<a href="'+commenturl+'" target ="_top">'+commenttext+'</a>';towrite=towrite+commenttext;flag=1;;}
if(displaymore==true)
{if(flag==1)towrite=towrite+' | ';towrite=towrite+'<a href="'+posturl+'" class="url" target ="_top">More »</a>';flag=1;;}
document.write(towrite);document.write('</li>');if(displayseparator==true)
if(i!=(numposts-1))
document.write('');}document.write('</ul>');}
//]]>
</script>
Note: to add your own pic for the posts with no thumbnail, replace the image url in blue with your own

Update! For a better image resolution add this script above the </body> tag:
<script type='text/javascript'>                  
function changeThumbSize(id,size){
var blogGadget = document.getElementById(id);
var replacement = blogGadget.innerHTML;
blogGadget.innerHTML = replacement.replace(/s72-c/g,"s"+size+"-c");
var thumbnails = blogGadget.getElementsByTagName("img");
for(var i=0;i&lt;thumbnails.length;i++){
thumbnails[i].width = size;
thumbnails[i].height = size;
}
}
changeThumbSize("label_with_thumbs",210);             
</script>
Now Save the template to finish with your changes.

So, what we have added, is the CSS to style the widget and the script to make it work. Now all we have to do is to add the widget's code to the blog sidebar in a HTML/JavaScript gadget:

Step 4. Go to Layout - click on Add a Gadget

blogger layout, add a gadget

Step 5. From the pop-up window, choose the HTML/Javascript widget and paste this script inside the empty box:
<script type='text/javascript'>var numposts = 3;var showpostthumbnails = true;var displaymore = false;var displayseparator = true;var showcommentnum = false;var showpostdate = false;var showpostsummary = true;var numchars = 100;</script>
<script type="text/javascript" src="/feeds/posts/default/-/Name-of-the-label?published&alt=json-in-script&callback=labelthumbs"></script>

Note: Where it says Name-of-the-label should be the name of the label that you want to display, and if your label is case sensitive, like in my example, then you should type it that way.

Within the last code, there are these parts which can be customized - change true with false or vice versa:
var numposts ← Number of posts to display
var showpostthumbnails ← Show/hide thumbnails
var displaymore ← Show or hide the read more link
var displayseparator ← Show/hide separator
var showcommentnum ← Show/hide the number of comments
var showpostdate ← Show/hide the posts dates
var showpostsummary ← Show or not the posts summaries
var numchars ← Number of posts characters (here you have to change the 100 value)
Remember that the gadget displays the latest posts from a particular label... therefore, if you want to display the latest posts from other labels, repeat step 5 for each additional category that you want to add.

That's it :) Enjoy!

Sunday, March 31, 2013

Related Posts Widget with Thumbnails and Summary for Blogger

There are several tutorials quite old in which I have shown different methods for displaying related posts in Blogger [1] [2] but in this tutorial, you will learn how to implement a really awesome Related Posts widget with Thumbnails and Posts Snippets that will appear in the footer of all your blog posts. If you want to get an idea of how it looks like, please visit this demo blog.

Now let's see how to add the related posts widget with thumbnails and summaries in a Blogger template:

Adding Related Posts Widget with Summaries to Blogger
related posts widget with thumbnails and summaries

Step 1. From your Blogger Dashboard, go to Template and click on Edit HTML


Step 2. Click anywhere inside the code area and then press CTRL + F to open the Blogger search box


Step 3. Type or paste this tag inside the search box and hit enter to find it:
</head>
After you found it, paste this script just above it:
<script type='text/javascript'>
//<![CDATA[
var relatedTitles = new Array();
var relatedUrls = new Array();
var relatedpSummary = new Array();
var relatedThumb = new Array();
var relatedTitlesNum = 0;
var relatedPostsNum = 4; // number of entries to be shown
var relatedmaxnum = 75; // the number of characters of summary
var relatednoimage = "https://blogger.googleusercontent.com/img/b/R29vZ2xl/AVvXsEgh0sM2_wj8CUKHFV5AzX6dOu3dgjxTYMBPZSYnqnC3F74Btr-Px6QuUVQkVj6G4E6ETl63Q3sNUsNG5oABugH4PAyACTq2rGXAgPAqc7hgnHsNQGLynG5CZd4pnudCA7_IByMzmdUB-8qs/s1600/no_image.jpg"; // default picture for entries with no image
//]]>
</script>
<script src="http://helplogger.googlecode.com/svn/trunk/related-posts-with-thumbs-and-summaries.js" />
Note:  
    - To change the number of posts that are being displayed, modify the value in red (4)
    - To change the number of characters to be shown in posts summary, modify the value in green (75)
    - To change the default pic for posts with no images, add your URL instead of the one marked in blue

      Now that we added the script, we will need to add the style. Paste the following code above the same </head> tag:
      <style>
      .relatedsumposts {
          float: left;
          padding: 0px 10px;
          overflow: hidden;
          text-align: center;
        /* width and height of the related posts area */
          width: 120px;
          height: 200px;
          border-right: 1px solid #E5E5E5;
          display: inline-block;
      }

      .relatedsumposts:hover {
          background-color: #F7F7F7;
      }

      .relatedsumposts img:hover {
          -webkit-transform: rotate(360deg);
          -moz-transform: rotate(360deg);
          -o-transform: rotate(360deg);
      }

      .relatedsumposts a {
        /* link properties */
          color: #linkcolor;
          display: inline;
          font-size: 10px;
          line-height: 1;
      }

      .relatedsumposts img {
        /* thumbnail properties */
          margin-top: 2px;
          height: 82px;
          padding: 5px;
          width: 82px;
          border: 1px solid #fff;
          -webkit-border-radius: 100px;
          -moz-border-radius: 100px;
          border-radius: 100px;

          -webkit-box-shadow: 0 1px 2px rgba(0, 0, 0, .4);
          -moz-box-shadow: 0 1px 2px rgba(0, 0, 0, .4);
          box-shadow: 0 1px 2px rgba(0, 0, 0, .4);
          -webkit-transition-duration: 0.8s;
          -moz-transition-duration: 0.8s;
          -o-transition-duration: 0.8s;
          transition-duration: 0.8s;
          -webkit-transition-property: -webkit-transform;
          -moz-transition-property: -moz-transform;
          -o-transition-property: -o-transform;
          transition-property: transform;
          overflow: hidden;
      }

      .relatedsumposts h6 {
        /* title properties */
          display: table-cell;
          height: 3em;
          margin: 5px 0 0;
          overflow: hidden;
          padding-bottom: 2px;
          vertical-align: middle;
          width: 130px;
      }

      .relatedsumposts p {
        /* summary properties */
          border-top: 1px solid #E5E5E5;
          border-bottom: 1px solid #E5E5E5;
          color: #summarycolor;
          font-size: 10px;
          height: 4em;
          line-height: 1;
          margin: 5px 0 0;
          overflow: hidden;
          padding: 5px 0 15px 0;
          text-align: left;
      }

      #relatedpostssum {
          background: #F3F3F3;
          height: 200px; /* related posts container */
          padding: 5px;
          width: 100%;
      }

      .relatedpoststitle {
          font-size: 19px;
          font-weight: bold;
          border-top: 3px solid #FB8227;
          color: #777;
          display: inline-block;
          padding: 5px 10px;
          width: 190px;
          float: left;
          margin: 0px -200px 0px 20px;
          transform: rotate(90deg);
          transform-origin: left top 0;
          -ms-transform: rotate(90deg);
          -ms-transform-origin:left top 0;
          -webkit-transform: rotate(90deg);
          -webkit-transform-origin:left top 0; 
         font-family: Gill Sans / Gill Sans MT, sans-serif;
      }
      </style>
      Note:  
        - Modify the values in red to adjust the width (120) and height (210) of the widget area
        - Replace #linkcolor with the hex value of your color to change the color of post titles
        - If you want to change the size of thumbnails, modify the values marked in violet (82)
        - To determine the border roundness, modify the values in orange (100)
        - To change the color of the post snippet, change #summarycolor with color hex value
        - In case you add more that 5 related posts, change the container height 200px to 400px

        2nd Note: If you have a dark background, you may want to add this style instead (see the screenshot):

        related posts widget with thumbnails and summaries
         <style>
        .relatedsumposts {
            float: left;
            padding: 0px 10px;
            overflow: hidden;
            text-align: center;
          /* width and height of the related posts area */
            width: 120px;
            height: 200px;
            border-right: 1px solid #0A0A0A;
            display: inline-block;
        }

        .relatedsumposts:hover {
            background-color: #0A0A0A;
        }

        .relatedsumposts img:hover {
            -webkit-transform: rotate(360deg);
            -moz-transform: rotate(360deg);
            -o-transform: rotate(360deg);
        }

        .relatedsumposts a {
          /* link properties */
            color: #linkcolor;
            display: inline;
            font-size: 10px;
            line-height: 1;
        }

        .relatedsumposts img {
          /* thumbnail properties */
            margin-top: 2px;
            height: 82px;
            padding: 5px;
            width: 82px;
            border: 1px solid #000;
        background:#282828;
            -webkit-border-radius: 100px;
            -moz-border-radius: 100px;
            border-radius: 100px;

            -webkit-box-shadow: 0 1px 2px rgba(0, 0, 0, .4);
            -moz-box-shadow: 0 1px 2px rgba(0, 0, 0, .4);
            box-shadow: 0 1px 2px rgba(0, 0, 0, .4);
            -webkit-transition-duration: 0.8s;
            -moz-transition-duration: 0.8s;
            -o-transition-duration: 0.8s;
            transition-duration: 0.8s;
            -webkit-transition-property: -webkit-transform;
            -moz-transition-property: -moz-transform;
            -o-transition-property: -o-transform;
            transition-property: transform;
            overflow: hidden;
        }

        .relatedsumposts h6 {
          /* title properties */
            display: table-cell;
            height: 3em;
            margin: 5px 0 0;
            overflow: hidden;
            padding-bottom: 2px;
            vertical-align: middle;
            width: 130px;
        }

        .relatedsumposts p {
          /* summary properties */
            border-top: 1px solid #0A0A0A;
            border-bottom: 1px solid #0A0A0A;
            color: #summarycolor;
            font-size: 10px;
            height: 4em;
            line-height: 1;
            margin: 5px 0 0;
            overflow: hidden;
            padding: 5px 0 15px 0;
            text-align: left;
        }

        #relatedpostssum {
            background: #121212;
            height: 200px; /* related posts container */
            padding: 5px;
            width: 100%;
        }

        .relatedpoststitle {
            font-size: 19px;
            font-weight: bold;
            border-top: 3px solid #FB8227;
            color: #ccc;
            display: inline-block;
            padding: 5px 10px;
            width: 190px;
            float: left;
            margin: 0px -200px 0px 20px;
            transform: rotate(90deg);
            transform-origin: left top 0;
            -ms-transform: rotate(90deg);
            -ms-transform-origin:left top 0;
            -webkit-transform: rotate(90deg);
            -webkit-transform-origin:left top 0;
           font-family: Gill Sans / Gill Sans MT, sans-serif;
        }
        </style>
        Step 4. Next, search (CTRL + F) for the following code snippet:
        <a expr:href='data:label.url' rel='tag'><data:label.name/></a><b:if cond='data:label.isLast != &quot;true&quot;'>,</b:if>
        And after you found it, add this script just below it:
        <b:if cond='data:blog.pageType == &quot;item&quot;'>
            <script expr:src='&quot;/feeds/posts/default/-/&quot; + data:label.name + &quot;?alt=json-in-script&amp;callback=readpostlabels&amp;max-results=50&quot;' type='text/javascript'/>
          </b:if>
        The entire fragment should look like this:
                  <b:loop values='data:post.labels' var='label'>
                    <a expr:href='data:label.url' rel='tag'><data:label.name/></a><b:if cond='data:label.isLast != &quot;true&quot;'>,</b:if>
        <b:if cond='data:blog.pageType == &quot;item&quot;'>
            <script expr:src='&quot;/feeds/posts/default/-/&quot; + data:label.name + &quot;?alt=json-in-script&amp;callback=readpostlabels&amp;max-results=50&quot;' type='text/javascript'/>
          </b:if>

                  </b:loop>
        Step 5. Finally, find this fragment of code:
        </b:includable>
        <b:includable id='postQuickEdit' var='post'>
        Note: search only the line in red and after you find it, you should see the </b:includable> tag above it

        ! Click on the sideways arrow to expand the code, then scroll down until you reach to the highlighted line !

        Just ABOVE the </b:includable> tag, add the following code:
        <b:if cond='data:blog.pageType == &quot;item&quot;'>
          <div class='post-footer-line post-footer-line-4'>
           <div class='relatedpoststitle'>RELATED POSTS</div>
        <div id='relatedpostssum'>
              <script type='text/javascript'>showrelated();</script>
            </div>
            <div style='clear:both;'/>
          </div>
        </b:if>
        Screenshot

        Step 6. Click on the Save Template button to save the changes and you're done!

        Note: in case you see the 'undefined' message, make sure that you have added the appropriate labels to your posts - which can be found in at least one more post, otherwise the script may not be able to find any related posts for that entry.

        Tuesday, March 19, 2013

        CSS Basics. How to Apply Rounded Corners On Images #2

        blogger tricks, css tricks, border radiusIn the previous post I have mentioned that we will learn about how to create rounded images using CSS, without needing to edit them one by one using a program. Now that we have seen the basics of CSS, let's try to apply it on some pictures.

        What we will do in this tutorial is to upload an image (HTML) and then add some rules in the stylesheet that will transform the outer shape to look like a circle... or, at least, to appear round. This will depend on the proportions of that picture we will use.

        In fact, we can apply this effect to any picture, to a specific part of our blog or to all the pictures found in our blog. This depends on your tastes.

        Marking up HTML

        Obviously, the first thing we need to do in order to set a rounded border around an image is to get a picture and upload it to get the html structure. The code could be a little bit more complicated, but an image is built within the img tag, which basically, looks like this:
        <img src="image_URL"/>
        Screenshot:


        Adding this code inside the HTML of the post with the url of our image - instead of the text in blue - we will be able to display it like this image on the left.

        Usually, it might also contain an alt text, and sometimes, may have some predetermined dimensions (with a specific width and/or height). When we upload an image using the Blogger post editor, the code will also have a link pointing to the original image.

        But if we want to modify this image using CSS, we need to add a class selector. We can add it in two ways: within the img tag or in a parent box. The name that I have chosen for the image selector is roundedcorners, however, you can add any name you want:
        <img class="roundedcorners" src="image_URL"/>


        <div class="roundedcorners">
        <img src="image_URL"/>
        </div>

        Applying style to all homogeneous elements

        But that selector alone won't do anything special. It needs to be linked to a style rule telling what to do with it. The same if when we add just classes, if these are not defined within the CSS, the appearance of a picture (or a certain element) will not change.

        To change the shape of the all the pictures on our blog, this is what we should add to our CSS:
        img {
        border: 2px solid #BADA55;
        margin: 0;
        padding: 0;
        border-radius: 1000px;
        -moz-border-radius: 1000px;
        }
        And how this translates to your browser?

        Search for images by name tag (img) and apply the following style:
        • a solid green border of 2 pixels
        • set the margins (space outside the border) and padding (space inside the border) to zero
        • apply the rounded corner look to all the four corners
        Now that we have this rule in our style sheet itself, we'll be able to see the picture as we want - take a look at the image on the right.

        To declare a property correctly, we need to know what it does and how to write it - details which could be found all over the internet, although W3C is the authority in this.

        For instance, the border-radius property initially requires four (4) values reading from left to right, which represent the roundness of the upper-left, upper-right, lower-right and lower-left corner. If you add a single value, it will make all the four corners to be equal with that value.

        It is important to mention that when the value of the border exceeds the dimensions of the container, this border will create a circle.

        How to apply the same style on the elements of the same container

        Sometimes, we don't want all the images on our blog to be round, but only the ones that we choose, otherwise adding the style above within the head tag will make all the pictures taking this shape. Before, we used an HTML tag (img) and not a selector and, for this reason, the style will affect all our images.
        To avoid this, we can do one of the things we saw at the beginning of this post and that was to place the image inside a div with the roundedcorners class. This way, only the images within the container with that class will be affected by the rule that will make them round.
        <div class="roundedcorners"><img src="image_URL"/></div>
        But the rule then should not affect the img tag directly, but the roundedcorners selector. In this case, you should write it like this:
        .roundedcorners img {
        border: 2px solid #BADA55;
        ....
        }
        This implies that this style applies only to images that are within the container with the roundedcorners class.

        Final words

        To end this tutorial on creating pictures with rounded borders, keep in mind that if these are not square, instead of becoming circular, they will look oval:


        To fix this we should add the width and height with the same measure (value in pixels) to force the image cropping and to make it appear perfectly circular. That was all!

        If you enjoy reading this blog, please share and subscribe. For any questions, drop a comment below ;)